PortraitPro software has, over the years, become the go-to program for retouching portrait and wedding photos. I bought it near the inception and was very pleased with the results.
With version 18, it does pretty much the same things it did way back then, but is much faster, more flexible, and has additional features.
It is offered in three packages, Standard, Studio, and Studio Max. I received the Studio Max package for review. This is the version I would recommend to professional portrait photographers as well as wedding photographers, mainly because it will handle RAW and TIF image files. The TIF format offers 16 bit depth, which delivers the maximum dynamic range (the difference between the highlights and shadows). Also, if restricted to JPG images, which are 8 bit, the image files are lossy compressed, and when retouched, they have to be resampled to JPGs again for saving, which will increase the number of lossy artifacts.
The RAW file is not really an image. It consists of the raw pixel data. To view the image, your photo software, including PortraitPro 18, converts the raw data to an image. If you want to save the converted raw data as an image, it has to be saved as a TIF file or a JPEG (or one of the other image file types that are less-often used).
The features in each package are shown below for comparison.
![]()
If you are a PortraitPro user already, then adjusting to the new and improved features in version 18 will be easy. However, I will give a complete description of how to use this program here, as some of you will be purchasing this software for the first time.
Installation is straightforward and easy.
When you boot the program, you are presented with an option of loading a single image or multiple images. Most of the time, it will probably be a single image. For this review, I utilized a single image of myself, which was a TIF file, shown below.
It asks you if the image is female or male, or a child younger than 12 years.
![]()
Then it loads the image with left side showing the original and the right side showing the effects of the accumulated retouching that you will be doing. Initially, the left-hand side shows a grid that outlines the front edge of the scalp, the eyebrows, nose, lips, and jaw (first photo below). Using the mouse, you can fine tune the outline if there are any discrepancies. In this case, the eyebrows and front of the scalp needed adjustment (second photo below).
![]()
![]()
Once the outline is where you want it, you can begin the retouching.
In the example photos, the head and neck have been zoomed in. You can see the entire photo in the top right-hand corner. Using the wheel on the mouse, you can zoom in or zoom out to show less or more of the entire photo. However, for the retouching process, it is best to stay zoomed in to the head, because that is where the retouching occurs.
On the right-hand side of the workspace are the menus for the adjustments for retouching. You have Face Sculpt, Skin Smoothing, Skin Lighting & Coloring, Makeup, Eye, Mouth & Nose, Hair, Picture, and Layers.
![]()
So, let’s start with Face Sculpt. Here is the list of things you can change (shown below). They include Face Shape, Eye Widening, Mouth Shape, and others. There is also a Master Fade that lets you decrease or increase all of the things under Face Sculpt at the same time.
![]()
Next, we have Skin Smoothing.
![]()
Mostly, Skin Smoothing includes the removal of items like Thin Wrinkles, Fine Shadows, Grease, and Pores.
Skin Lighting & Coloring is next, shown below.
![]()
Then, Makeup, shown below. Obviously, this is more practical with females, but it is still useful for males, as long as you don’t go overboard. Perhaps a bit of Blusher or Bronzer.
![]()
For the Eyes, shown below, I whitened the eyes, brightened the iris, and added a bit of sharpening.
![]()
For the Mouth & Nose (shown below), teeth whitening is a good choice.
![]()
With Hair, for someone older like me, selecting a dark hair recoloring works well, as it removes some of the gray, altered by using the slider to affect the amount of hair recoloring and lightening.
![]()
Under Picture, you can change the Color Temperature, Exposure (brightness), and Contrast.
![]()
Using the Layers menu, shown below, you can change the background by selecting Create Background Mask.
![]()
You can see that the bottom right is not fully masked (shown above). So, you select Fill Foreground (the foreground being the person), and using the mouse, you brush the areas that are not fully masked.
This results in a fully-masked foreground, shown below.
![]()
To add a background, you can choose a solid color, a gradient, or add a photograph of a background.
Here is an example of a gradient. It is similar to the original, but the color is changed slightly. I could not do this by simply altering the original background because it would have also changed my skin color.
![]()
I also experimented with using a photograph of a background that I created using Adobe Illustrator, which employs vectors. I clicked Add Background Image Layer and Select Image. I then browsed to the directory where the vector was stored and clicked on it.
![]()
I moved the vector around on the screen until the alignment of the vertical stripes blended well with the photo of myself.
You can choose from a small library of background photos that are supplied with PortraitPro 18.
There are adjustment brushes that can be used for various things, such as removing blemishes that the skin menus did not. To access this particular brush, you go to the menu bar at the top of the workspace and click the Touch Up button. This displays the following menu.

You select the size of the brush and its strength and then brush over the blemishes to remove them.
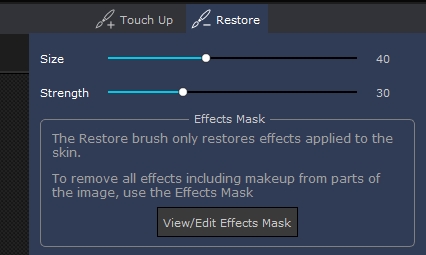
There is also a Restore brush, accessed by clicking the Restore button on the menu bar. It displays the following menu.

You select the Size and Strength, and then click the Effects Mask button, which displays the masked image and menu shown in the photo below.
![]()
You select either Extend, which adds the effect to the image, or Cut Back, which deletes the effect. Then you brush over the area of the image that you want the brush to affect. In the image shown above, I have brushed over the eyes to reduce the retouching effect.
To speed things up considerably, you can open your portrait, and choose from an array of presets that apply varying amounts of retouching. I tried this, and it worked beautifully, choosing the Standard preset. If you are new to PortraitPro, presets are a good idea while you learn to use the extensive menus of retouching options to perfect your skills.
Once you have completed the retouching, you go to File and Save As to save your retouched portrait.
![]()
Conclusions
PortraitPro 18 is an excellent program, and in my opinion, is one of the most useful software programs that are available to photographers.

To visit PortraitPro’s website, click here.


